
Getting the Most from Your Spin Down Filter
The iSpring WSP50ARJ sediment filter is a powerful ally against grit, sand, dirt and other particles that plague water systems. With proper installation and maintenance as covered in this manual, it will deliver clean, sediment-free water for your home for years to come.
In this comprehensive guide, we’ll share tips and best practices for:
- How the WSP50ARJ filter works
- Ideal installation positioning
- Step-by-step setup instructions
- Flushing and maintenance
- Maximizing filter lifespan
- Parts and specifications
- Troubleshooting common issues
- FAQs
Follow along to gain the knowledge to properly install your WSP50ARJ filter, keep it running optimally, and resolve any problems that arise. Let’s dive in!
How the WSP50ARJ Spin Down Filter Works
The WSP50ARJ utilizes an advanced spin down sediment filtration method to remove particulates from water. Here’s how it works:
- Water enters the inlet at the top of the cylindrical chamber
- Flow is directed around the inner walls in a spiraling vortex pattern
- Centrifugal force pushes particles outward to the perimeter
- Sediment accumulates in the outer filtration layers
- Purified water exits through the bottom outlet port
This continuous spinning action efficiently traps debris and prevents it from passing into plumbing and appliances. Over time, the filter cartridge fills with sediment until flow becomes restricted. Then it’s time to replace it.
Ideal Installation Positioning
Installing your WSP50ARJ filter properly ensures optimal contaminant removal. Always position it:
- Vertically – This allows water to flow downward through the filter chamber.
- With room below – Leave 6″ clearance to easily change cartridges.
- Close to water source – Filter water before other treatment systems.
- With straight tubing runs – No sharp bends obstructing flow.
- With arrow pointing UP – Indicates proper flow direction.
Maintaining the correct vertical orientation allows gravity to facilitate the crucial downward spinning flow inside the housing.
Step-By-Step WSP50ARJ Setup
Once you’ve selected the ideal installation location, follow these steps to properly set up your WSP50ARJ spin down filter:
Inspect Contents
The WSP50ARJ package includes:
- Sediment filter assembly
- Mounting bracket
- 1″ male-threaded inlet and outlet fittings
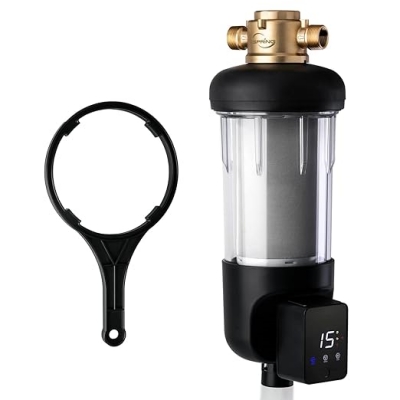
- Filter housing wrench
- NSF certification
- Owner’s manual
First inspect all parts to ensure nothing is damaged or missing.
Mount Filter Housing
The mounting bracket allows installing your WSP50ARJ filter on a wall or other flat vertical surface.
Hold assembly against the mounting surface and mark locations of the bracket holes. Drill holes at marked spots then secure bracket using provided screws.
Mount the filter assembly firmly onto the bracket. Make sure it sits completely flush.
Connect Inlet and Outlet
Use the included 1″ NPT fittings to connect the filter inlet and outlet to your main water line using one of these configurations:
In-Line – Install between water source and pressurized storage tank.
End Of Line – Install after pressure tank just before water treatment appliances.
Apply Teflon tape to threads then tighten fittings securely. Ensure arrow on filter points UP in the direction of flow.
Turn on water supply and check for leaks. Tighten any leaking fittings further. Now your filter is ready for flushing.
Flush the Filter
New sediment filters contain loose media particles that should be flushed out prior to use:
- Remove the bottom drain plug.
- Fully open the inlet valve until water runs clear from the drain.
- Close the drain plug once flushing is complete.
This important step prevents loose filtration material from entering your plumbing. Your filter is now ready for use!

Ongoing Filter Maintenance
To keep your WSP50ARJ performing optimally for years, follow this simple maintenance routine:
- Replace filter cartridge every 6 months, or sooner if flow becomes reduced.
- Inspect O-rings during changes and lubricate with food-grade grease.
- Backflush filter annually by running water full force through the flush port.
- Monitor pressure drop across the filter using inlet/outlet gauges.
- Keep exterior clean by wiping down with damp cloth. Avoid chemical cleaners.
Be sure to source replacement cartridges direct from the manufacturer to guarantee compatibility and performance. Proper maintenance keeps it running like new.
Maximize Filter Cartridge Life Span
You can maximize the lifespan of your filter cartridges by:
- Replacing more frequently if on private well water with heavy sediment loads. Every 3-4 months may be needed.
- Using a 5 micron sediment pre-filter before an RO system to reduce membrane fouling.
- Avoiding sudden cartridge changes from 1 to 5 microns that release captured sediment. Transition gradually.
- Flushing new cartridges properly upon installation to wash away loose media.
- Following the factory recommended replacement schedule for your water conditions.
- Backflushing the housing 1-2 times per year to eject built up particles.
Taking steps to prevent premature clogging keeps replacement intervals as long as possible.
WSP50ARJ Filter Specifications
- Dimensions: 6″ x 14″ (inlet/outlet ports add 2.5″)
- Connection Size: 1″ MNPT inlet/outlet
- Flow Rate: 15 GPM service, 25 GPM flush
- Pressure Range: 20-125 psi max
- Temp. Range: 40-100°F
- Filtration: 50 microns
- Materials: Lead-free brass, polypropylene, Buna-N
- Certifications: NSF 42 Standard
Understanding the capabilities of your filter model allows you to size it properly for your home’s water demands.
Troubleshooting Common Spin Down Filter Problems
In the event any issues arise with your WSP50ARJ filter, here are some troubleshooting tips:
Reduced Water Pressure:
- Cartridge exceeded capacity and is clogged with sediment. Replace cartridge.
- Crimped or blocked tubing. Check entire water line for obstructions.
- Leaking at inlet/outlet fittings. Tighten fittings with wrench if needed.
Cloudy Water:
- New cartridge not flushed properly. Drain tank and flush lines.
- Sudden filter grade change released built-up sediment. Switch gradually.
Leaking Filter Housing:
- Damaged O-ring. Disassemble to inspect and lubricate/replace O-rings.
- Loose locking ring. Tighten ring with provided housing wrench.
- Crack in housing. Seal with waterproof epoxy or replace housing.
No Water Flow:
- Cartridge completely clogged. Replace filter cartridge.
- Closed supply valve. Open inlet shutoff valve completely.
- Frozen pipes. Allow pipes to thaw. Insulate vulnerable pipes.
If any other issues arise, don’t hesitate to contact our water treatment experts for troubleshooting advice.
Frequently Asked WSP50ARJ Spin Down Questions
Here are answers to some common customer questions about the WSP50ARJ filter:
How do I know when to replace the cartridge?
Check pressure gauges before and after the filter – replace cartridge if the PSI drop reaches 10. Or replace every 6 months.
Does the housing need regular cleaning?
No. The design is self-cleaning when replacing the cartridge. Just wipe exterior with a damp cloth.
How long do cartridges typically last?
Average cartridge life is 6-12 months for typical municipal water – less if on a sediment-heavy private well.
Can I install vertically with flow going upward?
No. Proper function requires downward flow under gravity. Position filter arrow pointing upward.
Is lubrication needed when reassembling?
Yes. Apply food-grade grease on O-rings during cartridge changes to allow tight sealing.
What micron size should I choose?
Standard spin down filters are 50 microns. For well water, consider a 20 micron sediment pre-filter to extend cartridge life.
What flow rate is needed for backflushing?
Open inlet valve fully until flow from flush port equals filter’s rated 15 GPM service flow.
Please reach out to our water treatment specialists for any other water filter questions. We hope this guide helps you maximize the value of your iSpring WSP50ARJ spin down sediment filter. Just a small investment in maintenance pays off in clean water for years to come!